FHB Logo Facebook LinkedIn Email Pinterest Twitter X Instagram Tiktok YouTube Plus Icon Close Icon Navigation Search Icon Navigation Search Icon Arrow Down Icon Video Guide Icon Article Guide Icon Modal Close Icon Guide Search Icon Skip to content
Subscribe
Log In
  • How-To
  • Design
  • Tools & Materials
  • Restoration
  • Videos
  • Blogs
  • Forum
  • Magazine
  • Members
  • FHB House
  • Podcast
Log In

Fine Homebuilding Project Guides

Wiring

Guide Home
  • Working with Electricity
  • Tools and Materials
  • Receptacles and Switches
  • Lights and Fans
  • Rough-In
  • Outdoor Wiring
  • Panels and Subpanels
How-To

Running Power to an Outbuilding

The hardest part may be digging the trench for the cable.

By Mike Litchfield, Michael McAlister
  • X
  • facebook
  • linkedin
  • pinterest
  • email
  • add to favorites Log in or Sign up to save your favorite articles

The first step to wiring an outbuilding is to figure out how many lights and outlets you need. If your needs are modest, you may be able to tap into an existing outlet in the main house and extend the circuit from it. Calculate the total loads for the existing circuit and the extension to see if the circuit has enough capacity. Otherwise, run a new circuit from the panel to the outbuilding.

Running Power to an Outbuilding

If the outbuilding isn’t more than 50 ft. from the house and has a few lights and outlets, it usually can be supplied by a 120v, 20-amp circuit and 12/2 w/grd UF cable. But check with local building authorities before you start. Get the necessary permit, code requirements, and inspection schedules.

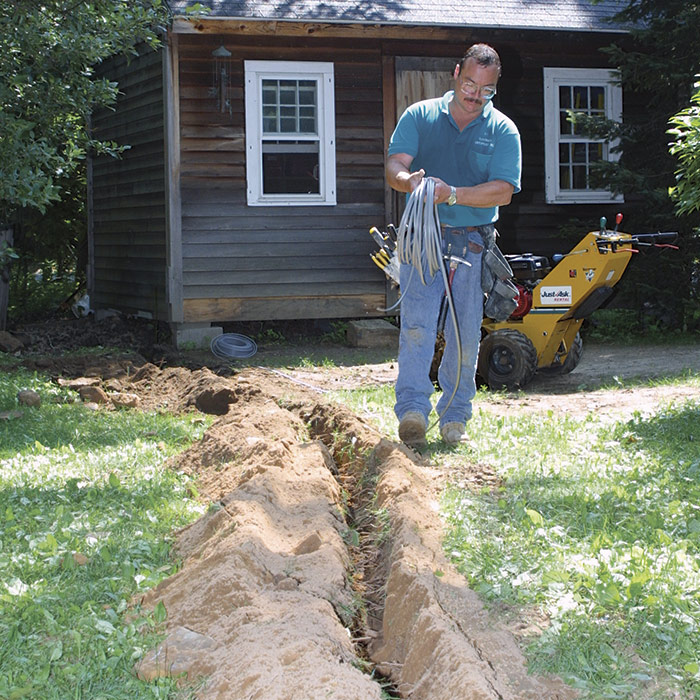
The hardest part of the job is usually digging the trench, because local codes typically require it to be 18 in. deep. Fortunately, you can rent a gas-powered trencher to do the digging for you. After removing the dirt from the trench, pick out any rocks or debris that could damage the cable. Then lay the UF cable in the trench, flattening it as you go 1.

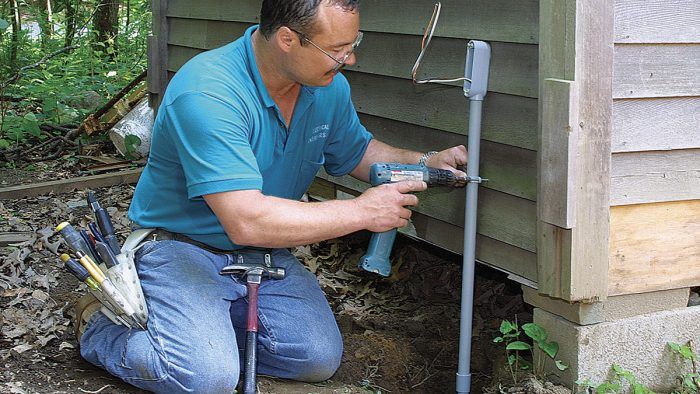
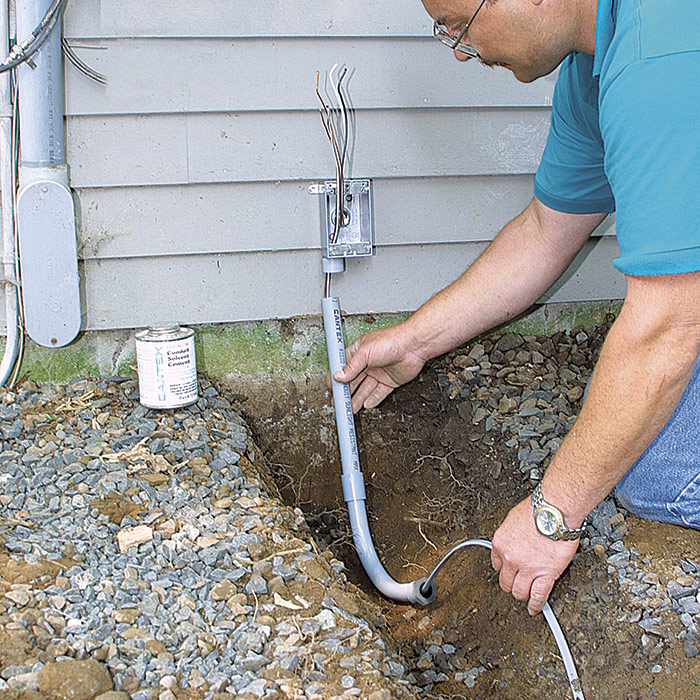
Use electrical-grade PVC conduit, couplings, and adapters to protect the UF cable between the bottom of the trench and the outdoor boxes in which connections will be made. At the house, UF cable is typically spliced to an interior wire in a covered single-gang, weathertight box 2. On the other end, the cable typically passes through an LB conduit and a short length of PVC pipe before terminating in a junction box inside the outbuilding 3.
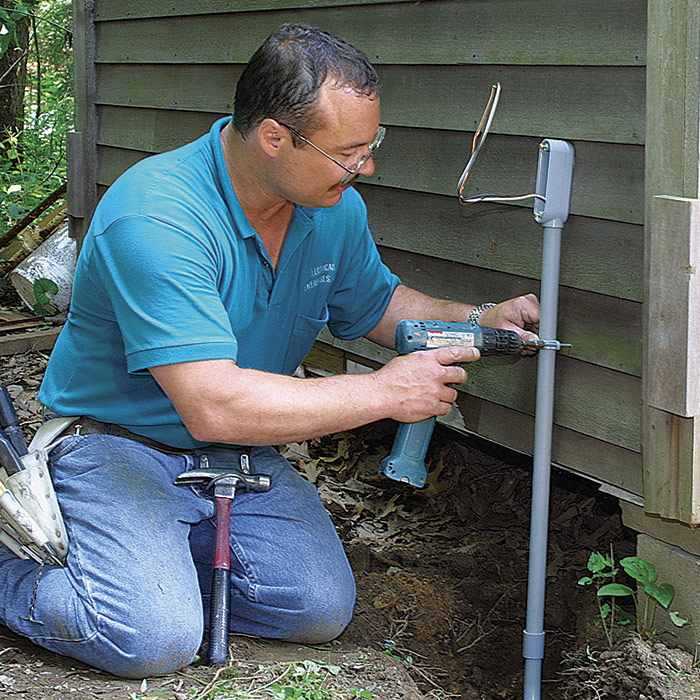
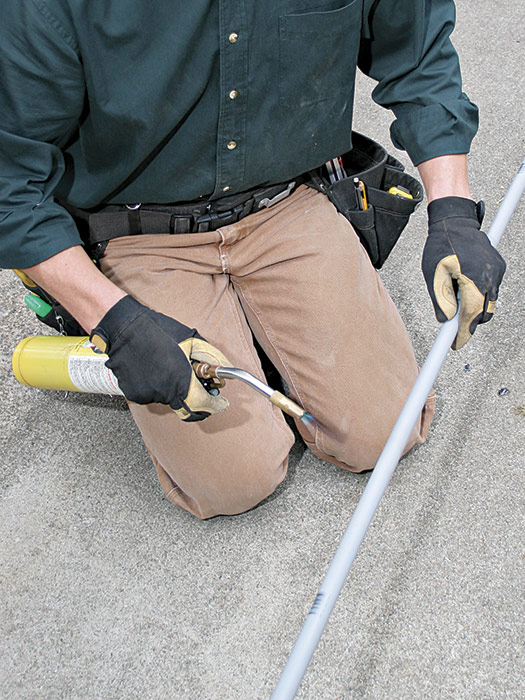
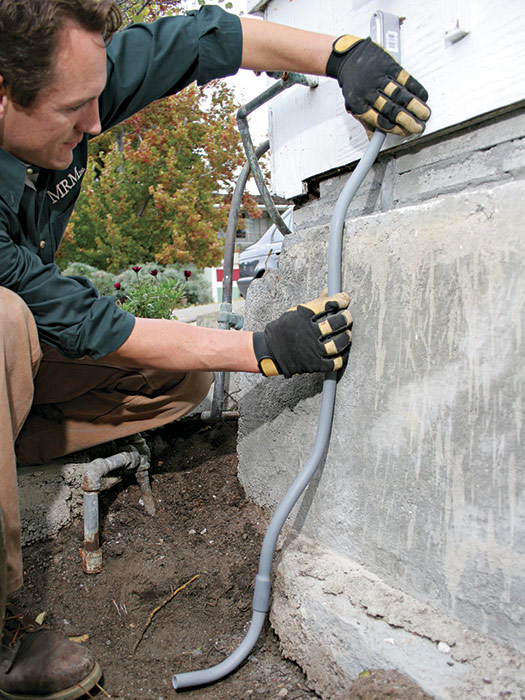
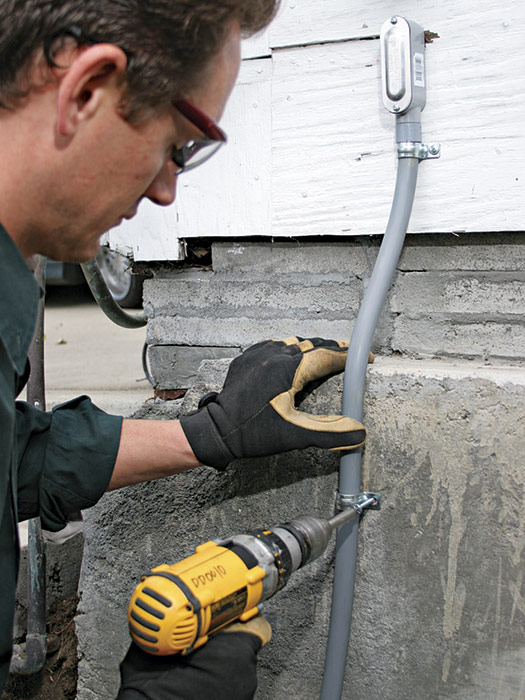
1  As you walk along the trench, unwind the cable. Ideally, it should lie flat in the bottom of the trench.
1) As you walk along the trench, unwind the cable. Ideally, it should lie flat in the bottom of the trench.

2  A PVC stub protects UF cable as it emerges from the ground.
2) A PVC stub protects UF cable as it emerges from the ground.

3  Strap rigid PVC pipe (with LB conduit) to the outbuilding.
3) Strap rigid PVC pipe (with LB conduit) to the outbuilding.


Working with PVC Conduit

PVC conduit can be heated and bent, allowing you to change pipe direction with far less cutting and fewer fittings than you would need for rigid pipe. PVC conduit is intended to be used outside: It is flexible, durable, and waterproof; but its assemblies are not as protective as metal pipe or cable. Be sure to use only the gray PVC conduit rated for electrical work (also called schedule-40 PVC conduit). White PVC plumbing pipe is unsuitable as electrical conduit; moreover, heating it can release noxious fumes. Wear work gloves to avoid burns when heating gray PVC pipe.

It’s best to use a hacksaw with a metal-cutting blade to cut PVC pipe, though any fine-tooth saw will work. Make the cut as square as possible. Use a pocket knife or curved file to remove burrs from the pipe end, then wipe it with a rag. Apply an even coat of PVC cement to the outside of the pipe and the inside of the fitting. If you’re bending pipe, screw the threaded adaptor into the outdoor box or conduit first, then glue the bent pipe to the adapter.

To bend PVC pipe, heat it with a MAP-gas torch; one common brand is the Bernz-Omatic®. You can also use a hot box or a PVC heating blanket (Greenlee®). Keep the torch point moving constantly, rotate the pipe periodically, and tape the pipe ends to contain the heat and speed up the process. When the pipe droops, it’s ready to shape. Place it against an irregular wall or foundation and it will conform to that contour. Strap the pipe close to the outdoor box and the foundation. To secure straps to the foundation, first predrill with a masonry bit. Then insert expandable plastic anchors into the holes and drive strap screws into the anchors.

To bend PVC pipe, heat it with a handheld MAP-gas torch. Rotate the pipe and keep the torch moving to heat the pipe evenly.

When the heated PVC pipe begins to droop, you know it’s ready to bend. Shape it to fit the side of the building or foundation.

Use straps to secure the pipe to exterior walls and foundations.


Wiring Complete, 3rd Edition

Excerpted from Wiring Complete, 3rd Edition (The Taunton Press, 2017) by Michael Litchfield and Michael McAlister

Available in the Taunton Store and at Amazon.com.

Previous: Stripping UF-B cable Next: Tools and Materials for Outdoor Wiring

Guide

Wiring

Chapter

Outdoor Wiring

Sign up for eletters today and get the latest how-to from Fine Homebuilding, plus special offers.

Signing you up...

This site is protected by reCAPTCHA and the Google Privacy Policy and Terms of Service apply.
See all newsletters
See all newsletters

Log in or create an account to post a comment.

Sign up Log in

Become a member and get full access to FineHomebuilding.com

Wiring

Wiring

Trusted, code-compliant guidance from the pros for working safely on any wiring project

View Project Guide

View All Project Guides »

Become a member and get unlimited site access, including the Wiring Project Guide.

Start Free Trial

Working with Electricity
  • Basics
  • Safety
  • Troubleshooting and Upgrades
Tools and Materials
  • Electrical Tools
  • Electrical Boxes
  • Cables and Wires
Receptacles and Switches
  • Materials
  • Wiring Receptacles
  • Wiring Switches
Lights and Fans
  • Lighting Design
  • Installing Lights
  • Fans
Rough-In
  • Planning
  • Installing Electrical Boxes
  • Running Cable
  • Retrofit Work
  • Making Connections in Boxes
  • Electrical Conduit
Outdoor Wiring
  • Basics
  • Outlets
  • Installing Lighting
Panels and Subpanels
  • Understanding Panels
  • Circuits
  • Installing a Subpanel

Fine Home Building

Newsletter Sign-up

  • Fine Homebuilding

    Home building tips, offers, and expert advice in your inbox.

  • Green Building Advisor

    Building science and energy efficiency advice, plus special offers, in your inbox.

  • Old House Journal

    Repair, renovation, and restoration tips, plus special offers, in your inbox.

Signing you up...

This site is protected by reCAPTCHA and the Google Privacy Policy and Terms of Service apply.
See all newsletters

Follow

  • Fine Homebuilding

    Dig into cutting-edge approaches and decades of proven solutions with total access to our experts and tradespeople.

    Start Free Trial Now
    • Facebook
    • Instagram
    • X
    • LinkedIn
  • GBA Prime

    Get instant access to the latest developments in green building, research, and reports from the field.

    Start Free Trial Now
    • Facebook
    • YouTube
  • Old House Journal

    Learn how to restore, repair, update, and decorate your home.

    Subscribe Now
    • Facebook
    • Instagram
    • X

Membership & Magazine

  • Online Archive
  • Start Free Trial
  • Magazine Subscription
  • Magazine Renewal
  • Gift a Subscription
  • Customer Support
  • Privacy Preferences
  • About
  • Contact
  • Advertise
  • Careers
  • Terms of Use
  • Site Map
  • Do not sell or share my information
  • Privacy Policy
  • Accessibility
  • California Privacy Rights

© 2025 Active Interest Media. All rights reserved.

Fine Homebuilding receives a commission for items purchased through links on this site, including Amazon Associates and other affiliate advertising programs.

  • Home Group
  • Antique Trader
  • Arts & Crafts Homes
  • Bank Note Reporter
  • Cabin Life
  • Cuisine at Home
  • Fine Gardening
  • Fine Woodworking
  • Green Building Advisor
  • Garden Gate
  • Horticulture
  • Keep Craft Alive
  • Log Home Living
  • Military Trader/Vehicles
  • Numismatic News
  • Numismaster
  • Old Cars Weekly
  • Old House Journal
  • Period Homes
  • Popular Woodworking
  • Script
  • ShopNotes
  • Sports Collectors Digest
  • Threads
  • Timber Home Living
  • Traditional Building
  • Woodsmith
  • World Coin News
  • Writer's Digest
Active Interest Media logo
X
X
This is a dialog window which overlays the main content of the page. The modal window is a 'site map' of the most critical areas of the site. Pressing the Escape (ESC) button will close the modal and bring you back to where you were on the page.

Main Menu

  • How-To
  • Design
  • Tools & Materials
  • Video
  • Blogs
  • Forum
  • Project Guides
  • Reader Projects
  • Magazine
  • Members
  • FHB House

Podcasts

  • FHB Podcast
  • ProTalk

Webinars

  • Upcoming and On-Demand

Podcasts

  • FHB Podcast
  • ProTalk

Webinars

  • Upcoming and On-Demand

Popular Topics

  • Kitchens
  • Business
  • Bedrooms
  • Roofs
  • Architecture and Design
  • Green Building
  • Decks
  • Framing
  • Safety
  • Remodeling
  • Bathrooms
  • Windows
  • Tilework
  • Ceilings
  • HVAC

Magazine

  • Current Issue
  • Past Issues
  • Magazine Index
  • Subscribe
  • Online Archive
  • Author Guidelines

All Access

  • Member Home
  • Start Free Trial
  • Gift Membership

Online Learning

  • Courses
  • Project Guides
  • Reader Projects
  • Podcast

More

  • FHB Ambassadors
  • FHB House
  • Customer Support

Account

  • Log In
  • Join

Newsletter

Get home building tips, offers, and expert advice in your inbox

Signing you up...

This site is protected by reCAPTCHA and the Google Privacy Policy and Terms of Service apply.
See all newsletters
See all newsletters

Follow

  • X
  • YouTube
  • instagram
  • facebook
  • pinterest
  • Tiktok

Join All Access

Become a member and get instant access to thousands of videos, how-tos, tool reviews, and design features.

Start Your Free Trial

Subscribe

FHB Magazine

Start your subscription today and save up to 70%

Subscribe

This is your last free article.

Don't miss another expert tip or technique from building pros. Start your free trial today.

Start your FREE trial

Already a member? Log in

We hope you’ve enjoyed your free articles. To keep reading, become a member today.

Get complete site access to expert advice, how-to videos, Code Check, and more, plus the print magazine.

Start your FREE trial

Already a member? Log in

Privacy Policy Update

We use cookies, pixels, script and other tracking technologies to analyze and improve our service, to improve and personalize content, and for advertising to you. We also share information about your use of our site with third-party social media, advertising and analytics partners. You can view our Privacy Policy here and our Terms of Use here.

Cookies

Analytics

These cookies help us track site metrics to improve our sites and provide a better user experience.

Advertising/Social Media

These cookies are used to serve advertisements aligned with your interests.

Essential

These cookies are required to provide basic functions like page navigation and access to secure areas of the website.

Delete My Data

Delete all cookies and associated data