FHB Logo Facebook LinkedIn Email Pinterest Twitter X Instagram Tiktok YouTube Plus Icon Close Icon Navigation Search Icon Navigation Search Icon Arrow Down Icon Video Guide Icon Article Guide Icon Modal Close Icon Guide Search Icon Skip to content
Subscribe
Log In
  • How-To
  • Design
  • Tools & Materials
  • Restoration
  • Videos
  • Blogs
  • Forum
  • Magazine
  • Members
  • FHB House
  • Podcast
Log In

Fine Homebuilding Project Guides

Wiring

Guide Home
  • Working with Electricity
  • Tools and Materials
  • Receptacles and Switches
  • Lights and Fans
  • Rough-In
  • Outdoor Wiring
  • Panels and Subpanels
How-To

How to Wire an Instagram-Worthy Electrical Subpanel

When installing a panel, neatness counts, both for impressing clients and for future service.

By Matthew Millham Issue 276 - July 2018
  • X
  • facebook
  • linkedin
  • pinterest
  • email
  • add to favorites Log in or Sign up to save your favorite articles
Video Player is loading.
Current Time 0:00
/
Duration 0:00
Loaded: 0%
Stream Type LIVE
Remaining Time -0:00
 
1x
    • Chapters
    • descriptions off, selected
    • captions settings, opens captions settings dialog
    • captions off, selected

      This is a modal window.

      Beginning of dialog window. Escape will cancel and close the window.

      Text
      Background
      Window
      Font Size
      Text Edge Style
      Font Family

      End of dialog window.

      This is a modal window. This modal can be closed by pressing the Escape key or activating the close button.

      This is a modal window. This modal can be closed by pressing the Escape key or activating the close button.

      California electrician CJ Nielsen’s electrical work could probably be featured in an art museum—not with the abstract expressionists, but wherever it is that they keep the ideal representations of real-world objects (next to, I imagine, a Maloof chair).

      But for the time being, he’s still a working electrician, wiring up things that few people will ever see or appreciate. In his mind, that’s no excuse for doing a sloppy job.

      magazine spread of how to install an electrical subpanel
      In this video, CJ demonstrates how to wire up a subpanel that looks so good, you won’t want to put a cover on it (though, if the inspector checks in, you’ll have to). The process is detailed in his article, “Shipshape Subpanel Install,” in FHB #276.

      When installing electrical panels, it pays to do a neat job, if for no other reason than it makes it easier to find and fix problems in the future. It doesn’t hurt for getting referrals, either.

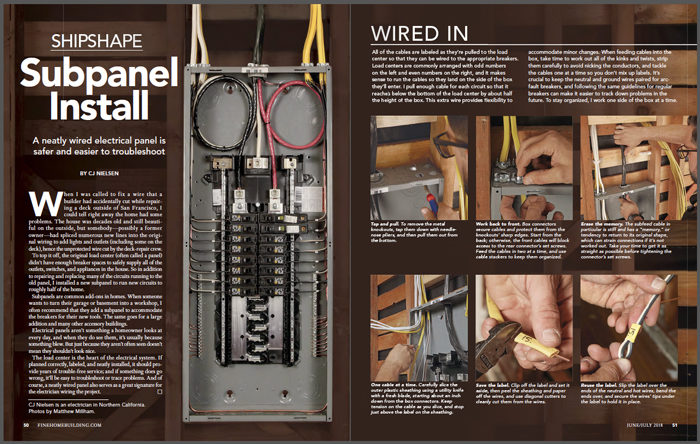
      Start by numbering each cable as you pull it to the box, and make sure they hang on the side of the box they’ll enter (most panels have odd-numbered breaker spaces on the left, even numbers on the right). Pull enough cable for each circuit so that it reaches below the bottom of the panel by about half the height of the box. This extra wire will give you flexibility to make minor changes to the breaker layout.

      Once the cables are pulled to the panel, remove the box knockouts. Tap them down with needle-nose pliers and pull them out from the bottom.

      Then install box connectors to secure the cables to the box and protect them from the sharp edges of the knockouts. Feed the cables into the box two at a time, working out any kinks. The feed cable in particular has a “memory,” or a desire to return to its original shape, which will put strain on the box and connections if it’s not worked out before it’s connected to the panel.

      CJ uses plastic cable stackers to keep the circuit cables neatly in the stud bay and in line with the connectors. After running each pair of wires into the box, secure them in the stacker. Here it’s mounted to a piece of 2×4 blocking to keep it centered in the wall.

      To make it easier to keep track of everything, tack a couple screws or nails into the studs on either side of the box to hold the wires out of the way. Always work one side of the box at a time to help keep everything in order.

      Once all the wires are in the box, use a utility knife with a fresh blade to carefully slice the outer plastic sheathing on the circuit cables. Start the cut about an inch down from the box connectors. Keep tension on the cable as you slice, and stop the cut just above the label on the sheathing. Clip off the label and set it aside, then peel off the sheathing and paper, and use diagonal cutters to cleanly cut this waste material from the wires.

      Next, separate the uninsulated ground from the other wires. Take the label you just snipped off and slip it on the neutral and hot wires, and bend the wires’ ends over to hold the label in place. Repeat the process for all of the circuit cables.

      Next, hook up the ground wires. Start by separating all of the paired neutrals and hots from the loose grounds. Take your time to untangle everything so that the grounds can be neatly pushed into the back corners of the box.

      Most panels come with one ground bus bar. To keep things neat, CJ installs a second ground bus—one on each side of the box—so the grounds don’t have to cross from one side to another.

      Going one wire at a time, use a finger to push the grounds into the back corner, and run your finger down the wire to straighten it out.

      Hold your finger on the wire across from the bus bar location where you’re going to attach it, make a soft 90° bend, and cut the wire to length. About 1/8 in. of copper should stick through the other side of the bus. Leave the bottom-most space on each ground bus bar open for a jumper.

      When done landing the grounds on one side, zip-tie them together so they stay neatly in the back of the box. Land the ground wire for the subfeed before zip-tying the grounds on the other side.

      To strip the subfeed, lightly score a line starting about an inch below the connector and down to the end of the cable. At the end, you can cut all the way through since the ends will be trimmed off. Starting from the bottom, simply pull the sheathing away from the cables, and it should split right on the scored line. Use diagonal cutters to trim the sheathing away at the top.

      Install a plastic insulating bushing onto the connector holding the feed cables, then separate out the feed’s ground wire, bend it to the right side of the box and down to the bus bar, and connect it to the ground bus bar the same as the other grounds, and zip tie them all together.

      Before moving on, CJ connects the ground bus bars together with the cutoff from the subfeed’s ground wire. This connection isn’t required, since the ground buses are connected to the box, but it guarantees the grounds are tied together.

      It’s always a good idea to leave some extra feed cable in the box to make future repairs easier. Electricians call this excess “service loops.” Take time to make the service loops neat and work out the cables’ memory so that they go into the lugs easily. Cables that are forced into the lugs are more likely to loosen over time, which could result in a fire.

      Start with the neutral, looping it so that its end will fall squarely in the lug. Line the cable up with the lug to determine where to trim it, then cut at that mark with diagonal cutters. To strip the end, use a utility knife to score a line around the cable 1 in. from the end, and then down to the end from this line, being careful not to nick the conductors. Use diagonal cutters to split and peel the insulation.

      Then insert the cable into its lug, leaving about 1/4 in. of copper exposed at the top so that you don’t pinch the insulation. Repeat the process for the two hot cables. When all the feed cables are in, zip-tie the service loops together so they stay neatly in the box.

      Next, move on to the neutrals. For standard breakers, it doesn’t matter where the neutral lands on the neutral bus. But for arc-fault breakers, the neutral connects directly to the breaker. It’s good practice to land all of the neutrals next to their corresponding breakers; that way, if you later want to swap a regular breaker for an arc-fault breaker, you won’t have to trace any wires.

      At this point, all of the hots and neutrals are still paired up and labeled. Land the neutrals in order according to your breaker layout—CJ sketches his layout out on a piece of cardboard to keep next to the panel for reference. As you go, make sure the label for each circuit stays on the hot wire when you separate out the neutral to connect it.

      Just like with the grounds, push the wire to the back corner of the box, run your finger down it until even with the space on the neutral bus where it’s going to land, hold your finger on the wire as a bending point, and bend a soft 90° with your other hand.

      Use wire strippers or diagonals to trim the excess, strip about 1/2 in. of insulation from the end, and insert the wire into the neutral bus bar just far enough that a little copper shows out the other side. You can always cut the wire a little long and nip it back once it’s in the bus bar.

      Since neutrals connect directly to arc-fault breakers, CJ installs the AFCIs as he’s landing the neutrals, rather than with the rest of the breakers, so that he can knock out all of the neutral connections at the same time. Once all of the neutrals are landed, zip-tie them together in each side of the box. Then install the rest of the breakers.

      Pick a side, and land the hot wires in order from top to bottom. Use the same technique as before to straighten the wire, bend it, and cut it to length. Strip out about 1/2 in. of insulation, insert it into the breaker, and tighten it down. Once you’re done connecting all of the hots, zip-tie them together, then go back with a torque driver to make sure all of the connections are tightened properly.

      When it’s all done, it should look something like the one CJ wired for “Shipshape Subpanel Install” in FHB #276.

      From Fine Homebuilding #276

      Previous: How to Install an Electrical Subpanel Next: Wiring a Subpanel

      Guide

      Wiring

      Chapter

      Panels and Subpanels

      Sign up for eletters today and get the latest how-to from Fine Homebuilding, plus special offers.

      Signing you up...

      This site is protected by reCAPTCHA and the Google Privacy Policy and Terms of Service apply.
      See all newsletters
      See all newsletters

      View Comments

      1. geokinney | Jul 30, 2018 09:33pm | #1

        The information in this video is worth ten times the cost of my annual subscription. Thank you for a great job.

      2. user-6824076 | Aug 23, 2018 03:57pm | #2

        What is the part number of the panel? I have not found one with a distributed neutral like your video.

        1. matt9923 | Feb 08, 2019 07:59am | #3

          Its called plug on neutral. Many of the major brands have them these days.

      Log in or create an account to post a comment.

      Sign up Log in

      Become a member and get full access to FineHomebuilding.com

      Wiring

      Wiring

      Trusted, code-compliant guidance from the pros for working safely on any wiring project

      View Project Guide

      View All Project Guides »

      Become a member and get unlimited site access, including the Wiring Project Guide.

      Start Free Trial

      Working with Electricity
      • Basics
      • Safety
      • Troubleshooting and Upgrades
      Tools and Materials
      • Electrical Tools
      • Electrical Boxes
      • Cables and Wires
      Receptacles and Switches
      • Materials
      • Wiring Receptacles
      • Wiring Switches
      Lights and Fans
      • Lighting Design
      • Installing Lights
      • Fans
      Rough-In
      • Planning
      • Installing Electrical Boxes
      • Running Cable
      • Retrofit Work
      • Making Connections in Boxes
      • Electrical Conduit
      Outdoor Wiring
      • Basics
      • Outlets
      • Installing Lighting
      Panels and Subpanels
      • Understanding Panels
      • Circuits
      • Installing a Subpanel

      Fine Home Building

      Newsletter Sign-up

      • Fine Homebuilding

        Home building tips, offers, and expert advice in your inbox.

      • Green Building Advisor

        Building science and energy efficiency advice, plus special offers, in your inbox.

      • Old House Journal

        Repair, renovation, and restoration tips, plus special offers, in your inbox.

      Signing you up...

      This site is protected by reCAPTCHA and the Google Privacy Policy and Terms of Service apply.
      See all newsletters

      Follow

      • Fine Homebuilding

        Dig into cutting-edge approaches and decades of proven solutions with total access to our experts and tradespeople.

        Start Free Trial Now
        • Facebook
        • Instagram
        • X
        • LinkedIn
      • GBA Prime

        Get instant access to the latest developments in green building, research, and reports from the field.

        Start Free Trial Now
        • Facebook
        • YouTube
      • Old House Journal

        Learn how to restore, repair, update, and decorate your home.

        Subscribe Now
        • Facebook
        • Instagram
        • X

      Membership & Magazine

      • Online Archive
      • Start Free Trial
      • Magazine Subscription
      • Magazine Renewal
      • Gift a Subscription
      • Customer Support
      • Privacy Preferences
      • About
      • Contact
      • Advertise
      • Careers
      • Terms of Use
      • Site Map
      • Do not sell or share my information
      • Privacy Policy
      • Accessibility
      • California Privacy Rights

      © 2025 Active Interest Media. All rights reserved.

      Fine Homebuilding receives a commission for items purchased through links on this site, including Amazon Associates and other affiliate advertising programs.

      • Home Group
      • Antique Trader
      • Arts & Crafts Homes
      • Bank Note Reporter
      • Cabin Life
      • Cuisine at Home
      • Fine Gardening
      • Fine Woodworking
      • Green Building Advisor
      • Garden Gate
      • Horticulture
      • Keep Craft Alive
      • Log Home Living
      • Military Trader/Vehicles
      • Numismatic News
      • Numismaster
      • Old Cars Weekly
      • Old House Journal
      • Period Homes
      • Popular Woodworking
      • Script
      • ShopNotes
      • Sports Collectors Digest
      • Threads
      • Timber Home Living
      • Traditional Building
      • Woodsmith
      • World Coin News
      • Writer's Digest
      Active Interest Media logo
      X
      X
      This is a dialog window which overlays the main content of the page. The modal window is a 'site map' of the most critical areas of the site. Pressing the Escape (ESC) button will close the modal and bring you back to where you were on the page.

      Main Menu

      • How-To
      • Design
      • Tools & Materials
      • Video
      • Blogs
      • Forum
      • Project Guides
      • Reader Projects
      • Magazine
      • Members
      • FHB House

      Podcasts

      • FHB Podcast
      • ProTalk

      Webinars

      • Upcoming and On-Demand

      Podcasts

      • FHB Podcast
      • ProTalk

      Webinars

      • Upcoming and On-Demand

      Popular Topics

      • Kitchens
      • Business
      • Bedrooms
      • Roofs
      • Architecture and Design
      • Green Building
      • Decks
      • Framing
      • Safety
      • Remodeling
      • Bathrooms
      • Windows
      • Tilework
      • Ceilings
      • HVAC

      Magazine

      • Current Issue
      • Past Issues
      • Magazine Index
      • Subscribe
      • Online Archive
      • Author Guidelines

      All Access

      • Member Home
      • Start Free Trial
      • Gift Membership

      Online Learning

      • Courses
      • Project Guides
      • Reader Projects
      • Podcast

      More

      • FHB Ambassadors
      • FHB House
      • Customer Support

      Account

      • Log In
      • Join

      Newsletter

      Get home building tips, offers, and expert advice in your inbox

      Signing you up...

      This site is protected by reCAPTCHA and the Google Privacy Policy and Terms of Service apply.
      See all newsletters
      See all newsletters

      Follow

      • X
      • YouTube
      • instagram
      • facebook
      • pinterest
      • Tiktok

      Join All Access

      Become a member and get instant access to thousands of videos, how-tos, tool reviews, and design features.

      Start Your Free Trial

      Subscribe

      FHB Magazine

      Start your subscription today and save up to 81%

      Subscribe

      We hope you’ve enjoyed your free articles. To keep reading, become a member today.

      Get complete site access to expert advice, how-to videos, Code Check, and more, plus the print magazine.

      Start your FREE trial

      Already a member? Log in

      Privacy Policy Update

      We use cookies, pixels, script and other tracking technologies to analyze and improve our service, to improve and personalize content, and for advertising to you. We also share information about your use of our site with third-party social media, advertising and analytics partners. You can view our Privacy Policy here and our Terms of Use here.

      Cookies

      Analytics

      These cookies help us track site metrics to improve our sites and provide a better user experience.

      Advertising/Social Media

      These cookies are used to serve advertisements aligned with your interests.

      Essential

      These cookies are required to provide basic functions like page navigation and access to secure areas of the website.

      Delete My Data

      Delete all cookies and associated data