Wiring a Bathroom
Electrician Cliff Popejoy explains best practices for running wire, nailing boxes, and installing fixtures.

Synopsis: Running electrical cable, installing boxes for outlets and switches, and preparing the boxes is a process collectively known to electricians as rough wiring. It’s a necessary component of any new construction or addition, and with a little guidance, one that even budget-conscious homeowners can tackle. Electrician Cliff Popejoy chose a typical bathroom to illustrate the finer points of code-compliant rough wiring. He discusses the need to plan the locations of outlets, switches, and fixtures. A drawing illustrates how with a few additions beyond the bare-minimum requirements for code can improve the bath’s comfort and function. After a brief rundown of the various types of electrical boxes, he demonstrates the installation and placement of switch and outlet boxes, a fan/light combo, and a recessed light. He shows his techniques for running cable, explains the difference between cable gauges, and the code requirements for attaching the cable. Last, he shows how to connect a three switch boxes to a home-run feed from the panel. Tips include recommended drill bits, stripping cable jackets, smart labeling of conductors, and how to figure circuit loads. Video Extras: How to Wire a Bathroom
If you want to invest some sweat equity in the house or addition you’re building, you might consider taking on the job of rough-wiring: installing boxes, running cable, and preparing the boxes before the drywall is hung. If the walls are open, it’s a straight forward job, and most building departments allow homeowners to do their own wiring. The task of installing the main service panel is complex and is best left to a professional electrician, but you’ll save money by doing the rest of the work yourself. And there’s no better place to start than the bathroom, a space that’s fairly dense with electrical needs but not overly complicated. Recently, I wired a small bathroom that was part of a new Habitat for Humanity house in Sacramento, Calif. The details of the job demonstrate the necessary steps for attaching boxes, running wire, and making the preliminary connections.
Circuit design and code requirements
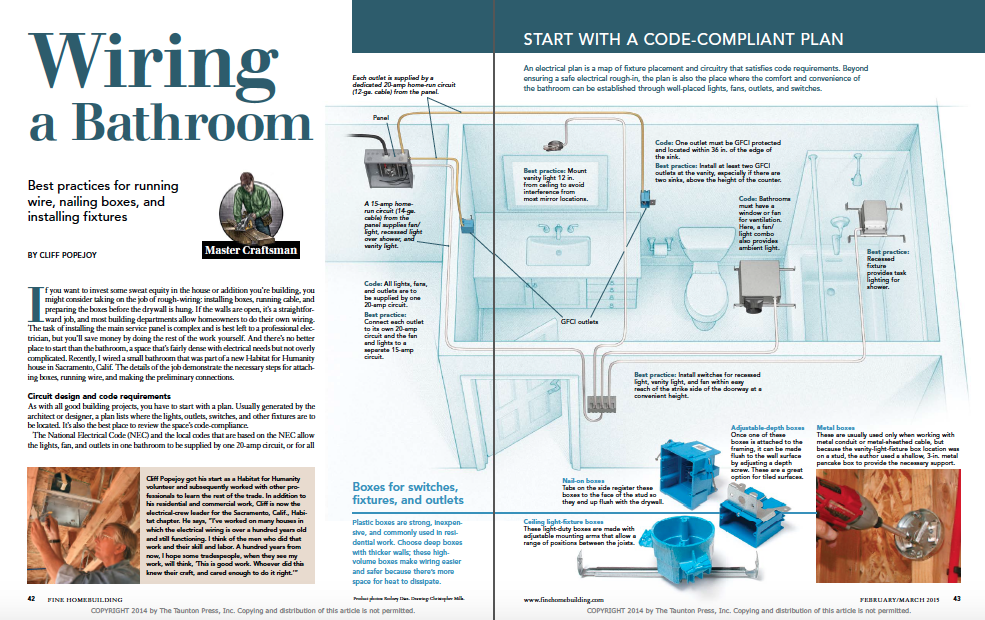
As with all good building projects, you have to start with a plan. Usually generated by the architect or designer, a plan lists where the lights, outlets, switches, and other fixtures are to be located. It’s also the best place to review the space’s code-compliance.

The National Electrical Code (NEC) and the local codes that are based on the NEC allow the lights, fan, and outlets in one bathroom to be supplied by one 20-amp circuit, or for all bathroom outlets in the house to be supplied by a 20-amp circuit. In the latter scenario, the bathroom lights and fans are connected to general-purpose 15-amp circuits. either option is less than ideal.
A single handheld hair dryer can come close to over-loading a 20-amp circuit all by itself, so I always put each duplex outlet on its own 20-amp circuit, and the vent fan and lights on one separate 15-amp circuit. If you’re in doubt as to a circuit’s capacity, do the load calculations to make sure you’re not overloading it.
All bathroom outlets must have GFCI (ground-fault circuit interrupter) protection. Most inspectors want to see outlets at or above the level of the counter, although the code does not specify height. Code does require a duplex outlet within 36 in. of the edge of each sink. If there is a double sink, put an outlet between them. Consider installing a pair of duplex outlets near each sink if, for instance, a hair dryer or curling iron are part of the morning routine. I strongly suggest running a separate 20-amp circuit for each outlet box, or even a 20-amp circuit for each duplex outlet. Here I installed two outlets, each on its own 20-amp circuit.

For more photos, drawings, and details, click the View PDF button below.


