FHB Logo Facebook LinkedIn Email Pinterest Twitter X Instagram Tiktok YouTube Plus Icon Close Icon Navigation Search Icon Navigation Search Icon Arrow Down Icon Video Guide Icon Article Guide Icon Modal Close Icon Guide Search Icon Skip to content
Subscribe
Log In
  • How-To
  • Design
  • Tools & Materials
  • Restoration
  • Videos
  • Blogs
  • Forum
  • Magazine
  • Members
  • FHB House
  • Podcast
Log In

Fine Homebuilding Project Guides

Wiring

Guide Home
  • Working with Electricity
  • Tools and Materials
  • Receptacles and Switches
  • Lights and Fans
  • Rough-In
  • Outdoor Wiring
  • Panels and Subpanels

Wiring One-and Two-Pole Breakers

Follow the guidelines for installing breakers for general-use, lighting, and small-appliance circuits as well as for larger-appliance circuits.

By Mike Litchfield, Michael McAlister
  • X
  • facebook
  • linkedin
  • pinterest
  • email
  • add to favorites Log in or Sign up to save your favorite articles

Installing a Standard One-Pole Breaker

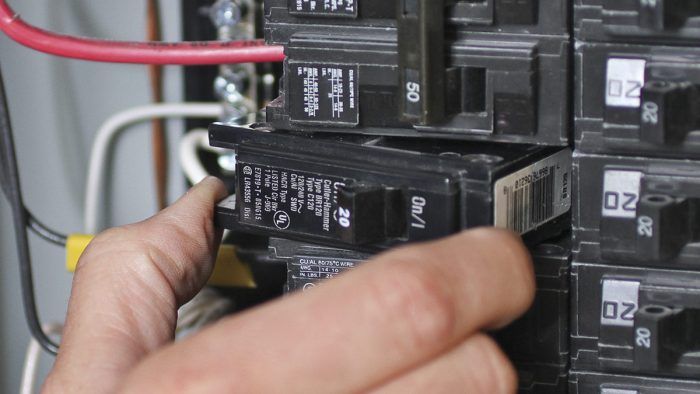
Typically, 15-amp or 20-amp one-pole breakers control general-use, lighting, or small-appliance circuits; they might also run a furnace, a pool pump, or a garbage disposer. In the photo sequence shown here, a single-pole breaker is being installed in a subpanel whose power has been turned off.

Terminate the ground wire first 1. In a subpanel, the ground will attach to a separate ground bus bonded to the metal panel. Insert only one ground wire beneath a lug screw. Note the consistent angle of all grounds in which they bend toward the bus. Look closely and you will also see that both ground and neutral wires are bundled with plastic ties to keep the box orderly.

Connect the ground wire to the ground bus of the subpanel.
1) Connect the ground wire to the ground bus of the subpanel.

Connect the neutral wire to the neutral bus.
2) Connect the neutral wire to the neutral bus.

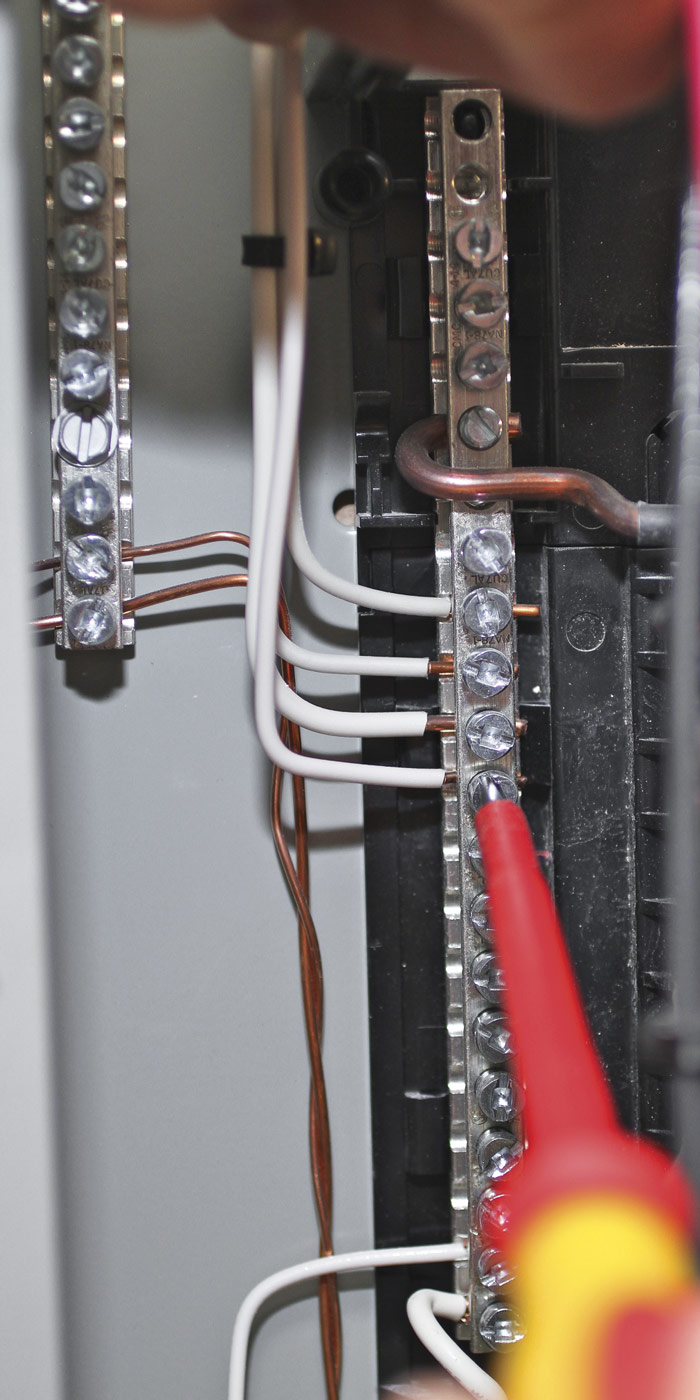
Next strip insulation from the neutral wire and connect it to the neutral bus 2. Because this is a subpanel, the neutral bus sits atop a black plastic bracket that electrically isolates the neutral bus from the metal panel box.

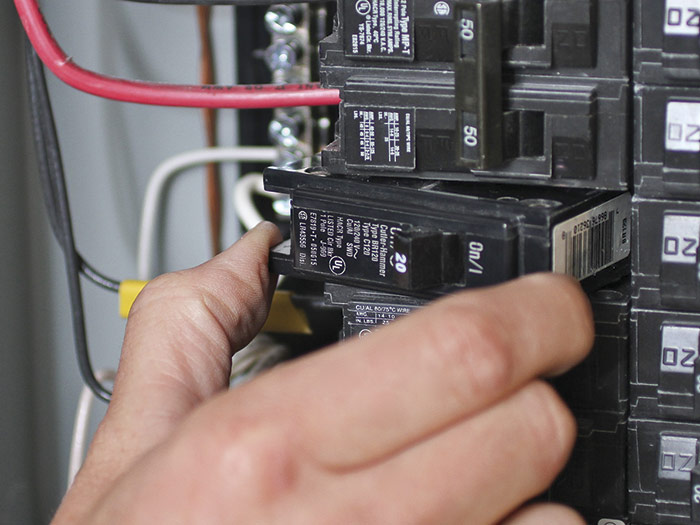
Snap the one-pole breaker onto a hot bus 3. The heel of the breaker seats on a plastic cleat and then pivots so that its jaws engage a metal bus sticking up. Press down to seat the breaker securely. Strip 3⁄8 in. to 1⁄2 in. of insulation from the end of the hot wire, then connect it to the lug screw on the end of the breaker 4. Note: Before attaching the hot wire, slip on the labeled slug of sheathing that identifies the circuit it feeds. Tighten the breaker lug to secure the hot wire.

Snap the breaker to a hot bus.
3) Snap the breaker to a hot bus.

Insert the hot wire into the breaker lug and tighten it down.
4) Insert the hot wire into the breaker lug and tighten it down.


Before flipping on the breaker, use a multimeter to test the new circuit for dead shorts, as described in “Trade Secret.” Once you are certain that the circuit has no shorts, remove a breaker-knockout from the subpanel cover, replace the cover, energize the subpanel, and flip on the new breaker.
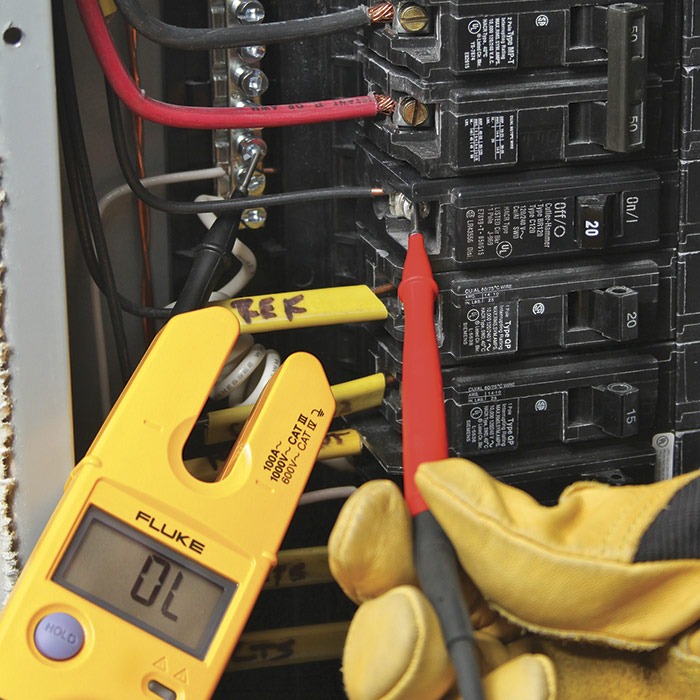
test the circuit
Before re-energizing the panel, test the circuit for shorts. Touch the tester probes to the breaker lug and ground bus, then touch the probes to the breaker lug and neutral bus.

Trade Secret

After installing a circuit breaker—but before re-energizing the panel and flipping on the breaker—use a multimeter set to test resistance (ohms). First make sure there are no loads on the circuit (e.g., light fixtures or appliances turned on). Touch the tool’s probes to (1) breaker lug and ground bus, then (2) breaker lug and neutral bus. You are looking for dead shorts—a reading of no resistance (0 ohms). If you get a 0 ohms reading DO NOT turn on the new breaker until you correct the problem. Dead shorts are commonly caused by drywall screws or nails driven through a cable, improperly wired devices, or connections in an outlet box that have come apart.


Installing a Two-Pole Breaker

In residences, two-pole breakers typically control ovens, dryers, ranges, AC condensers, and other big energy users. The photo sequence at right shows a 30-amp, two-pole breaker being installed in a subpanel. As 120v/240v wiring tends to be appliance-specific, this circuit feeds a dryer receptacle. As the dryer’s electronic components need 120v, this 30-amp circuit was wired with 10/3 w/grd Romex cable. In addition to two hot wires, the cable contains a neutral wire and a ground.

After calculating that the electrical system had sufficient capacity to add a 30-amp circuit and that there was room in the subpanel for a double breaker 1, the electrician turned off the subpanel breaker in the service panel and then tested the subpanel to be sure the power was off. That done, he removed the panel cover, removed a knockout in the panel box, installed a cable connector and fed 10/3 w/grd cable through it, tightened the cable connector, and removed the cable’s protective sheathing.

Two-pole breakers
1) Two-pole breakers clamp onto two hot buses. At left, you can see the plastic cleats that receive the heel of the breaker; at right, two hot-bus blades.

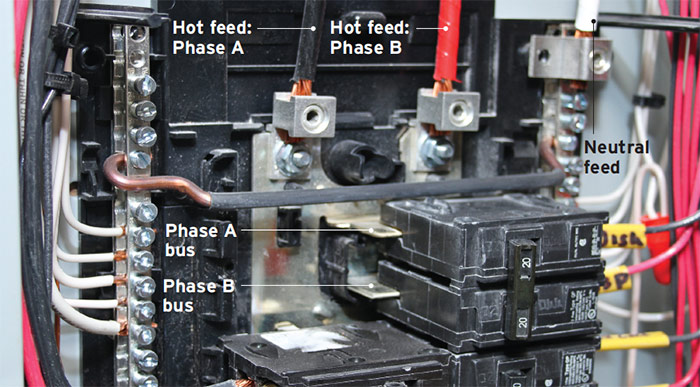
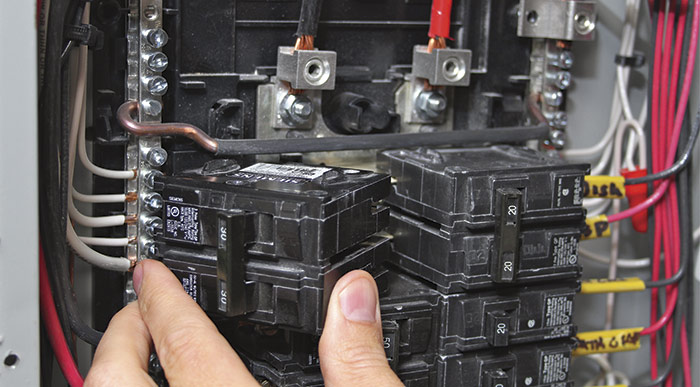
He terminated the cable’s bare ground wire at the subpanel’s ground bus, stripped insulation from the end of the neutral wire, and terminated it at the neutral bus. Before snapping a two-pole breaker onto hot buses 2, he made sure that it would land on a correct A-B bus position, that is, that the top jaws of the two-pole breaker would connect to a Phase A bus and the bottom jaws to a Phase B bus.

snap onto hot-bus blades
2) Place the heel side of the breaker on the plastic cleats, then pivot the breaker so its jaws snap onto hot-bus blades.

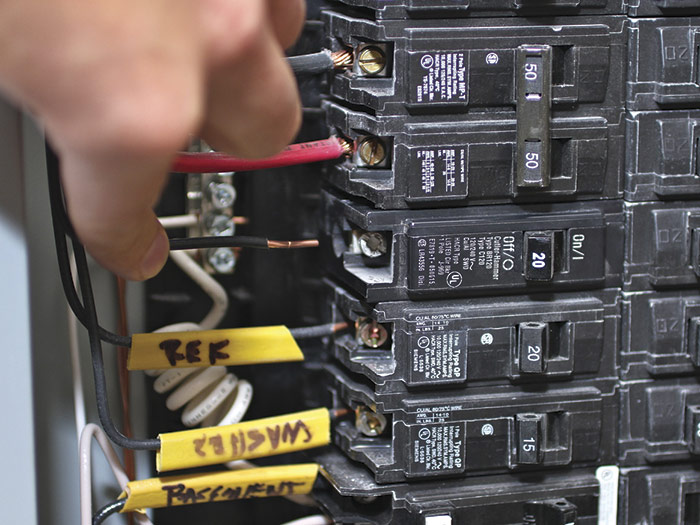
After slipping a labeled slug onto the cable’s black hot wire, the electrician terminated it to the breaker’s upper lug, then terminated the red hot wire to the breaker’s lower lug 3. He tightened both screws to ensure solid connections, then used a multimeter to test the circuit for dead shorts, as described in “Trade Secret.” Finding no dead shorts, he removed two breaker knockouts (two-pole breaker) from the subpanel cover, replaced the cover, energized the subpanel, and flipped on the new breaker.

Attach the circuit ground wire
3) Attach the circuit ground wire to the ground bus, neutral wire to neutral bus, then two hot wires to two-pole breaker lugs.


Wiring Complete, 3rd Edition

Excerpted from Wiring Complete, 3rd Edition (The Taunton Press, 2017) by Michael Litchfield and Michael McAlister

Available in the Taunton Store and at Amazon.com.

Previous: Adding a Circuit Next: Ground-Fault Circuit Interrupters (GFCIs)

Guide

Wiring

Chapter

Panels and Subpanels

Sign up for eletters today and get the latest how-to from Fine Homebuilding, plus special offers.

Signing you up...

This site is protected by reCAPTCHA and the Google Privacy Policy and Terms of Service apply.
See all newsletters
See all newsletters

Log in or create an account to post a comment.

Sign up Log in

Become a member and get full access to FineHomebuilding.com

Wiring

Wiring

Trusted, code-compliant guidance from the pros for working safely on any wiring project

View Project Guide

View All Project Guides »

Become a member and get unlimited site access, including the Wiring Project Guide.

Start Free Trial

Working with Electricity
  • Basics
  • Safety
  • Troubleshooting and Upgrades
Tools and Materials
  • Electrical Tools
  • Electrical Boxes
  • Cables and Wires
Receptacles and Switches
  • Materials
  • Wiring Receptacles
  • Wiring Switches
Lights and Fans
  • Lighting Design
  • Installing Lights
  • Fans
Rough-In
  • Planning
  • Installing Electrical Boxes
  • Running Cable
  • Retrofit Work
  • Making Connections in Boxes
  • Electrical Conduit
Outdoor Wiring
  • Basics
  • Outlets
  • Installing Lighting
Panels and Subpanels
  • Understanding Panels
  • Circuits
  • Installing a Subpanel

Fine Home Building

Newsletter Sign-up

  • Fine Homebuilding

    Home building tips, offers, and expert advice in your inbox.

  • Green Building Advisor

    Building science and energy efficiency advice, plus special offers, in your inbox.

  • Old House Journal

    Repair, renovation, and restoration tips, plus special offers, in your inbox.

Signing you up...

This site is protected by reCAPTCHA and the Google Privacy Policy and Terms of Service apply.
See all newsletters

Follow

  • Fine Homebuilding

    Dig into cutting-edge approaches and decades of proven solutions with total access to our experts and tradespeople.

    Start Free Trial Now
    • Facebook
    • Instagram
    • X
    • LinkedIn
  • GBA Prime

    Get instant access to the latest developments in green building, research, and reports from the field.

    Start Free Trial Now
    • Facebook
    • YouTube
  • Old House Journal

    Learn how to restore, repair, update, and decorate your home.

    Subscribe Now
    • Facebook
    • Instagram
    • X

Membership & Magazine

  • Online Archive
  • Start Free Trial
  • Magazine Subscription
  • Magazine Renewal
  • Gift a Subscription
  • Customer Support
  • Privacy Preferences
  • About
  • Contact
  • Advertise
  • Careers
  • Terms of Use
  • Site Map
  • Do not sell or share my information
  • Privacy Policy
  • Accessibility
  • California Privacy Rights

© 2025 Active Interest Media. All rights reserved.

Fine Homebuilding receives a commission for items purchased through links on this site, including Amazon Associates and other affiliate advertising programs.

  • Home Group
  • Antique Trader
  • Arts & Crafts Homes
  • Bank Note Reporter
  • Cabin Life
  • Cuisine at Home
  • Fine Gardening
  • Fine Woodworking
  • Green Building Advisor
  • Garden Gate
  • Horticulture
  • Keep Craft Alive
  • Log Home Living
  • Military Trader/Vehicles
  • Numismatic News
  • Numismaster
  • Old Cars Weekly
  • Old House Journal
  • Period Homes
  • Popular Woodworking
  • Script
  • ShopNotes
  • Sports Collectors Digest
  • Threads
  • Timber Home Living
  • Traditional Building
  • Woodsmith
  • World Coin News
  • Writer's Digest
Active Interest Media logo
X
X
This is a dialog window which overlays the main content of the page. The modal window is a 'site map' of the most critical areas of the site. Pressing the Escape (ESC) button will close the modal and bring you back to where you were on the page.

Main Menu

  • How-To
  • Design
  • Tools & Materials
  • Video
  • Blogs
  • Forum
  • Project Guides
  • Reader Projects
  • Magazine
  • Members
  • FHB House

Podcasts

  • FHB Podcast
  • ProTalk

Webinars

  • Upcoming and On-Demand

Podcasts

  • FHB Podcast
  • ProTalk

Webinars

  • Upcoming and On-Demand

Popular Topics

  • Kitchens
  • Business
  • Bedrooms
  • Roofs
  • Architecture and Design
  • Green Building
  • Decks
  • Framing
  • Safety
  • Remodeling
  • Bathrooms
  • Windows
  • Tilework
  • Ceilings
  • HVAC

Magazine

  • Current Issue
  • Past Issues
  • Magazine Index
  • Subscribe
  • Online Archive
  • Author Guidelines

All Access

  • Member Home
  • Start Free Trial
  • Gift Membership

Online Learning

  • Courses
  • Project Guides
  • Reader Projects
  • Podcast

More

  • FHB Ambassadors
  • FHB House
  • Customer Support

Account

  • Log In
  • Join

Newsletter

Get home building tips, offers, and expert advice in your inbox

Signing you up...

This site is protected by reCAPTCHA and the Google Privacy Policy and Terms of Service apply.
See all newsletters
See all newsletters

Follow

  • X
  • YouTube
  • instagram
  • facebook
  • pinterest
  • Tiktok

Join All Access

Become a member and get instant access to thousands of videos, how-tos, tool reviews, and design features.

Start Your Free Trial

Subscribe

FHB Magazine

Start your subscription today and save up to 70%

Subscribe

You have 1 free article remaining.

Get complete site access, including thousands of videos, how-to tips, tool reviews, and design features.

Start your FREE trial

Already a member? Log in

We hope you’ve enjoyed your free articles. To keep reading, become a member today.

Get complete site access to expert advice, how-to videos, Code Check, and more, plus the print magazine.

Start your FREE trial

Already a member? Log in

Privacy Policy Update

We use cookies, pixels, script and other tracking technologies to analyze and improve our service, to improve and personalize content, and for advertising to you. We also share information about your use of our site with third-party social media, advertising and analytics partners. You can view our Privacy Policy here and our Terms of Use here.

Cookies

Analytics

These cookies help us track site metrics to improve our sites and provide a better user experience.

Advertising/Social Media

These cookies are used to serve advertisements aligned with your interests.

Essential

These cookies are required to provide basic functions like page navigation and access to secure areas of the website.

Delete My Data

Delete all cookies and associated data