Occasionally I’m hired to replace door jambs that have been damaged by burglars. Often, only one jamb leg is damaged (the strike side of the door). The other side jamb and head jamb remain serviceable, so replacing the strike jamb without messing up the rest of the installation is the problem. Here’s how I do it.
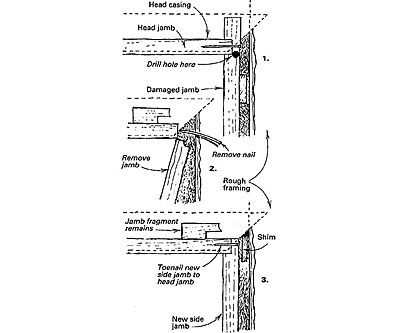
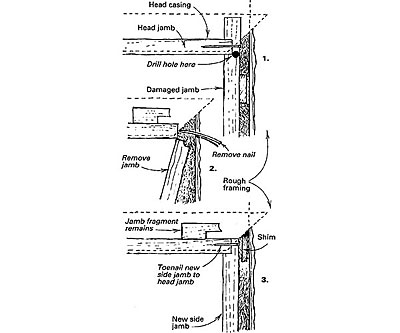
I begin by adding some extra finish nails to the door casings on the good leg and the top jamb. This step helps to hold everything in place. Then I pull the casings from the damaged jamb. Drawing 1 shows the point at which I drill a 1/4-in. or 5/16-in. hole in the side jamb next to the head jamb. This hole lops off the top of the damaged jamb. To remove the jamb, I cut it in half at about the height of the strike plate and pry away the two pieces.
Drawing 2 shows the jamb being removed and the fragment of the jamb top lying on the head jamb. If there’s room I pull this scrap out. If not, there’s usually room to shove it out of the way up top. If I can reach them, I pull the nails out of the head jamb with needlenose pliers. If I can’t, I use a reciprocating saw to nip them off.
Drawing 3 shows the new jamb in place. Note how I’ve cut off the end of the new jamb, giving it a rabbet instead of a dado. This allows the new jamb to be tucked into place if the clearance between the rough framing and the head jamb is tight. If there’s room I leave the dado in place. In either case, I toenail the new side jamb to the head jamb and back the joint with shims to keep it tight. Now the new jamb can be plumbed with shims or adjusted to match existing conditions.
Chris Dahle, Denver, CO

Click the "thumbs up" button above to vote for this tip. Help us choose Fine Homebuilding's top-10 window and door tips.


View Comments
Seems simple enough. Gonna try this on my front door's damaged jamb.