A Story-Pole Approach to Shingling a Roof
You'll be able to lay your shingles straight every time using this trick.
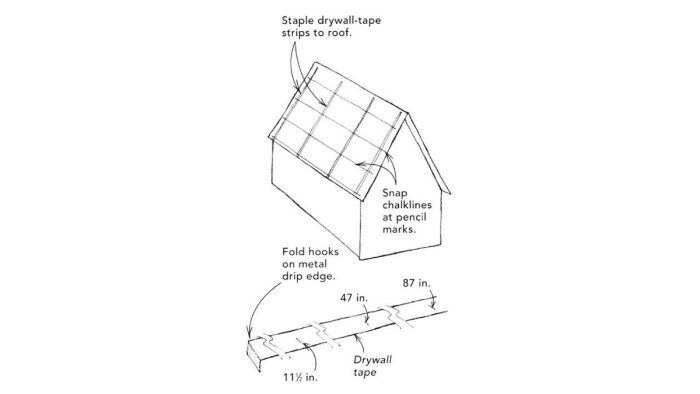
Although roofing isn’t one of my favorite tasks, I appreciate a straight, well-installed job. But my eyes aren’t what they used to be. These days, it is harder and harder to see the pencil marks for the alignment chalklines on a dark, tar-paper background. To make it easy for me to see the marks for the chalklines, I put them on drywall tape.
As shown in the drawing, I make marks on the drywall tape indicating the top edges of shingle courses. I put them at 40-in. intervals for shingles with 5-in. exposure so that I can check the installation every eight courses. In the example shown, the 11-1/2 in. mark allows for the starter and first course of 12-in.-wide shingles to extend 1/2 in. past the metal drip edge.
The subsequent marks on the tape refer to the exposure of the shingles plus the 12-in. width of the overlapping shingles. For example, the top of the second shingle course is 17 in. (5 in. + 12 in.) up from the drip edge. For any given course above, the top of the shingle is 12 in. higher: 17 in., 22 in., 27 in., 32 in., 37 in., 42 in., 47 in., and so forth.
I unroll strips of tape on the ground and mark them on the ground all at the same time. That step makes it easier to be accurate and lets me avoid the step of pulling a tape on a shingle to get a reference point. A fold at the end of each piece of tape hooks on the metal drip edge.
I staple these tape strips atop the tar paper at 12-ft. to 15-ft. intervals. Then I snap chalklines without having to hunt around for a hard-to-see pencil mark or snaking my tape down to the drip edge, hoping it won’t pull off as I get to the top of the roof.
— Bob Bulick; submitted via email
From Fine Homebuilding #162
RELATED STORIES
- How To Install Shingles and Step Flashing
- How to Get a Good-Looking Layout with Laminated Shingles
- Choosing New Asphalt Roof Shingles
Got a Tip?
Do you have any great tips like this one on how to keep shingles straight? Share your methods, tricks, and jigs with other readers. Tag them @FineHomebuilding on social, email them to us at tips@finehomebuilding.com, or upload them to FineHomebuilding.com/reader-tips. We’ll pay for any we publish.
Fine Homebuilding Recommended Products
Fine Homebuilding receives a commission for items purchased through links on this site, including Amazon Associates and other affiliate advertising programs.
Shingle Ripper
Hook Blade Roofing Knife
Flashing Boot Repair





View Comments
it seems like the math on this tip may be 1/2 an inch off for the 2nd course (and therefore all additional courses). If I overhang the first course 1/2 an inch over the drip edge, and then measure up 17 inches for the 2nd course, doesn't that make the exposure for the 1st course 5.5 inches?
I am an amateur and have only installed a few roofs so please offer me some clarification if I am just mixing these directions up in my head and messing it up.
Or, does an extra 1/2 inch exposure on the 1st course NOT make an important difference?
thanks,
Jed
*in the above comment i should have wrote: "and then measure up 17 inches from the drip edge (instead of from the overhanging shingle)"
I think you caught it Jed. This description messes with that 1/2 inch. Personally, I would align the first shingle with the drip edge and avoid the confusion. Besides, if you ever lean a ladder against that roof edge in the future, you won't be asking an unsupported asphalt shingle to resist the weight. It leaves obvious dents in the edge. For the same reason I use a heavy gauge metal drip edge.
Or, one could forego the old under performing tar paper and install modern synthetic underlayment that's better than tar paper in every way and also has a bonus of having nice straight grid lines printed on it.