Installing Deck Stringers
A secure connection at top and a solid base to land on is key for a sturdy deck stair.

There are three important aspects to installing stringers. First, the connection to the framing at the top of the stringer must be secure and able to support the weight of the stairs plus the considerable weight of additional loads. Second, the stringer must land on a solid base that, like the top, must support the load. In addition, the bottom connection must also resist the tendency of the stairs to kick away from the deck. And third, the geometry of the installation must agree with how the stringers were cut—that is, the run of each step must be level or nearly so.
Options for securing stringers
How you choose to attach the stringer to the deck framing will depend on your preference and on the project details. Shown here are three popular ways to secure stair stringers. One is to lag the butt ends of the stringer directly to the deck rim. This method extends the deck surface over the stringers. A second method is to add a supplemental ledger below the deck framing and support that ledger with posts. This method has the advantage of not putting additional load on the deck framing and is a good choice for a long run of stairs. The third choice is to extend the stringers beyond the ledger and attach them directly to the deck joists. This is a straightforward and secure way to attach stringers.
Three ways to secure stringers
 |
 |
 |
| Lag to Rim | Use Ledger with Posts | Bolt to Deck Joists |
No matter what attachment method you choose, it’s a good idea to fit the stringers before permanently securing them, as seen in the photos below. Locate the temporary screw low in the notch to reduce the risk of splitting the stringer before it’s permanently attached. With one stringer in place and resting on the landing, check the run for level. If the stringer’s run is level or pitched slightly toward the stringer bottom, that’s acceptable. If the slope is back, meaning the edge of the step closest to you when you walk up the steps is higher, then adjust the stringer position until the stringer run is level.
Temporarily attach all three stringers in place and double-check that they are located correctly. Often stringers will have slight variations. To account for this, level across all the stringers at the top step and adjust the middle stringer until it is even with the outside stringers. Level across the stringers at the bottom and adjust the low stringer up with shims until all three stringers are level. Also check the rise face across the stringers to make sure that they are aligned and make any adjustment necessary. When the stringers are positioned properly, permanently secure them to the deck framing.
For the project shown here, the joists ran parallel to the stringers, so the simplest attachment method was to run the stringer long and sister it to the joist. Whatever attachment method you choose, it is crucial that the fasteners or hangers secure the stringer near the bottom edge. Any portion of the stringer on the teeth side has no strength. To secure a stringer that does not align with a joist, install blocking to header off the joist end. Then secure the stringer to the blocking with through screws.
1. Test-fit the stringers before permanently securing them, being careful not to force the stringer into position.
2. Attach the stringer to the framing with temporary screws and register all three stringers from the same attachment point.
3. Check the stringer for a level run. If the run slopes back, the bottom of the stringer needs to drop in relation to the top.
4. Position all three stringers temporarily and repeat checks for overall fit and levelness of the run.
5. Level across all three stringers. The stringers should be within 1/16 in. If not, adjust the low stringer up if possible.
6. Check the rise alignment of all three stringers at each step and make adjustments so that they are within 1/16 in. at every step.
7. Attach the stringers to the deck framing with screws positioned low on the stringer.
8. Install blocking for joists that do not align with a deck joist. Secure the blocking with through screws or hardware.
9. Screw through the blocking to secure the joist. Fasteners positioned low on the stringer will carry more load.
Trade Secret: I like to add a strongback–a 2×4 board screwed to the side of the stringer to add stiffness–to every set of stairs I build. It’s an inexpensive way to make a noticeable difference in the feel of the finished stair assembly.
Securing stringers to the landing
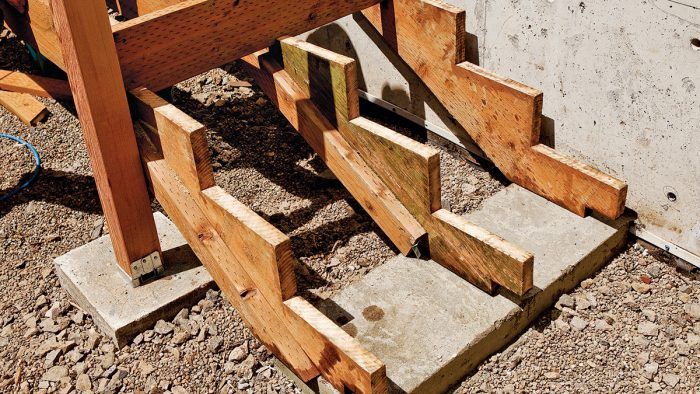
The easiest way to secure the stringers to the landing is with a kicker board. The kicker board is typically located on the landing at the front of the bottom step. Before securing the kicker, check the fit in the kicker recess. With the stringer positioned, use a masonry bit to drill through the kicker into the concrete pad. Then use an appropriately sized masonry bit to fasten the kicker to the pad. The position of the kicker does most of the work by preventing the stringer from moving forward. The connection of the stringer to the kicker is primarily to keep the stair assembly from bouncing or moving side to side, so using screws to fasten the stringer is sufficient. To reduce the chance of splitting the stringer drill a pilot hole for this connection.
1. Fit the kicker board into the notches at the bottom of the stringer and then check for level across the stringers.
2. Drill a hole through the kicker board and into the concrete with an appropriately sized masonry bit.
3. Drive a masonry fastener into the concrete to secure the kicker board.
4. Secure the stringer bottom to the kicker with toe screws, being careful not to split the stringer end.
Options for securing the stringers to the landing
It’s important to land the stairs on a secure pad that will resist lateral movement. There are three main ways to secure the stringer to the pad to transfer that lateral load. One way is to use galvanized brackets secured to both the stringer and the concrete. This has the advantage that no modifications need to be made when pouring the concrete pad or cutting the stringers. Another method is to secure a pressure-treated kicker board to the pad with masonry bolts. This is a very secure connection because the force of the stringer load pushes directly on the kicker’s face. Finally, in drier climates that are less prone to rot, you can choose to embed the kickers in the concrete and secure the stringers with brackets. This method avoids the need for using masonry fasteners.
Two ways to land stringers
 |
 |
| With Hardware | With a Surface Kicker |
Fine Homebuilding Recommended Products
Fine Homebuilding receives a commission for items purchased through links on this site, including Amazon Associates and other affiliate advertising programs.

Standard Marking Chalk

Cepco BoWrench Decking Tool

MicroFoam Nitrile Coated Work Gloves


