FHB Logo Facebook LinkedIn Email Pinterest Twitter X Instagram Tiktok YouTube Plus Icon Close Icon Navigation Search Icon Navigation Search Icon Arrow Down Icon Video Guide Icon Article Guide Icon Modal Close Icon Guide Search Icon Skip to content
Subscribe
Log In
  • How-To
  • Design
  • Tools & Materials
  • Restoration
  • Videos
  • Blogs
  • Forum
  • Magazine
  • Members
  • FHB House
  • Podcast
Log In
How-To

Leak-free Windows Series: Flashing Pre-Cased Jambs

Flashing windows and doors with pre-applied trim, such as brickmold, is a lot trickier than flashing a window or door with flanged jambs that will be covered with trim later.

By Mike Guertin
Video Player is loading.
Current Time 0:00
/
Duration 0:00
Loaded: 0%
Stream Type LIVE
Remaining Time -0:00
 
1x
    • Chapters
    • descriptions off, selected
    • captions settings, opens captions settings dialog
    • captions off, selected

      This is a modal window.

      Beginning of dialog window. Escape will cancel and close the window.

      Text
      Background
      Window
      Font Size
      Text Edge Style
      Font Family

      End of dialog window.

      This is a modal window. This modal can be closed by pressing the Escape key or activating the close button.

      This is a modal window. This modal can be closed by pressing the Escape key or activating the close button.

      In this video, Mike shows how to do it with specialized double-sided peel and stick membrane on one side and standard peel and stick membrane on the other.

      Video transcript:
      here’s another way to do a jamb flashing on a cased door, and that’s using a pre-made flashing tape designed specifically for door and cased window installations. This one is already prepared for both the face flashing, which goes on the wall, as well as the back flashing, which would go to the jamb as well as the back side of the casing itself. The part that goes on the back side of the casing and the jamb is already pre-scribed, which makes it real easy to pull off the release liner and expose the sticky part—and we can do that right now. We’ll just extend this down over the bottom of the jamb of the door by about 3 or 4 inches.

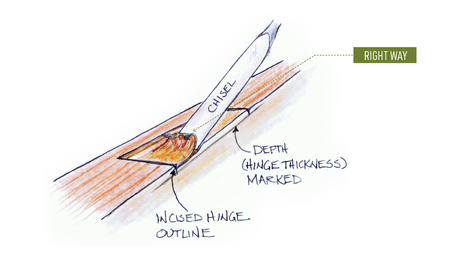
      Inside corners must be tight
      I’ll pull off that first strip of release liner, and then I’ll fold that adhesive part back onto its face so that it doesn’t stick when I put it on. This is a butyl-based adhesive, so it’s not quite as aggressive as an asphalt based, so that makes it a lot easier to work with. In the event that it sticks on to the jamb of the door—you don’t want it there—you just pull it back a little bit and reposition it, like I gotta do here. It’s really important to get it tight and crisp into the inside corner. We don’t want any bridging between the back of the casing and the back of the jamb, or we could end up with a problem with the door being held out from the wall a little bit. This middle strip of release liner will expose the adhesive to bond down to the back side of the door casing, and then I just need to make a relief cut at the bottom and a relief cut at the top so that we can fold that flashing tape flat against the wall.

      Tie the door in to the wall
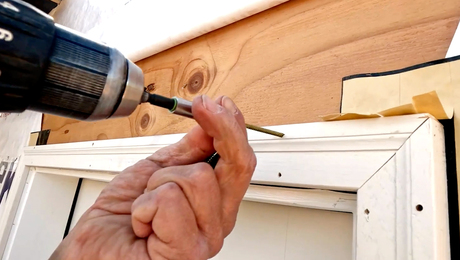
      Now we’re ready to install the door frame. I’m just going to put this in with a couple of drywall screws; it’s not something I typically do except for a demonstration, and it works just fine. The important part I want to address is how to deal with the flashing up against the wall. Essentially by back flashing using the flashing tape to the casing and to the jamb, we’ve created a little bit of a flange out here on the wall. Now I can remove this release paper that’s left on there—and just to hold this in place, I’m going to fold this little bit of top over and stick it to the wall; that just holds it from folding down on itself. Remove that release paper and get another strip of flashing tape.

      You need extra flashing tape if you use regular membrane
      This second strip of flashing tape can be any width that you want; it could be 4 inches like this, or you could go 6 or 9 inches, but 4 should be more than adequate. To do this, I’m just going to stick it to the wall, right over the sticky part that’s exposed beneath, and bond the whole edge down as I work my way along. With the pre-made flashing tape, it’s a little bit easier; we’ve already got the second piece of flashing tape applied, so we just have to remove the release liner. Once I get hold of the release liner, I can bond the top down to the wall, and then just pull the release tape off as I work my way down, pressing as I go. I’m starting to lose a little bit of that release paper, so I’ll work from the bottom up.

      Videos in this members-only series:

      • Series Introduction
      • Self-draining Sill Pans
      • Sill Pan Flashing Options
      • Sill Pan With Regular Peel-and-Stick
      • Sill Pan With Flexible Peel-and-Stick
      • Flashing Flanged Window Jambs
      • Flashing Pre-Cased Jambs
      • Head Flashing Windows/Doors
      • Counter-Flashing The Head

      Sign up for eletters today and get the latest how-to from Fine Homebuilding, plus special offers.

      Signing you up...

      This site is protected by reCAPTCHA and the Google Privacy Policy and Terms of Service apply.
      See all newsletters
      See all newsletters
      ×

      Get home building tips, offers, and expert advice in your inbox

      Signing you up...

      This site is protected by reCAPTCHA and the Google Privacy Policy and Terms of Service apply.
      See all newsletters
      See all newsletters

      New Feature

      Fine Homebuilding Forums

      Ask questions, offer advice, and share your work

      Log in or create an account to post a comment.

      Sign up Log in

      Become a member and get full access to FineHomebuilding.com

      Up Next

      Video Shorts

      Featured Story

      FHB Podcast Segment: Finding Hazardous Materials in a Fixer-Upper

      Look closely at these common locations for hazardous materials in older homes.

      Featured Video

      How to Install Cable Rail Around Wood-Post Corners

      Use these tips to keep cables tight and straight for a professional-looking deck-railing job.

      Related Stories

      • Vintage Sash Windows Get an Energy-Efficient Upgrade
      • Fire-Resistant Landscaping and Home Design Details
      • Breathing New Life into Original Windows
      • Mortising a Hinge without a Router

      Discussion Forum

      Recent Posts and Replies

      • |
      • |
      • |
      • |
      • |
      • |
      View More Create Post

      Highlights

      Fine Homebuilding All Access
      Fine Homebuilding Podcast
      Tool Tech
      Plus, get an extra 20% off with code GIFT20

      "I have learned so much thanks to the searchable articles on the FHB website. I can confidently say that I expect to be a life-long subscriber." - M.K.

      Get home building tips, offers, and expert advice in your inbox

      Signing you up...

      This site is protected by reCAPTCHA and the Google Privacy Policy and Terms of Service apply.
      See all newsletters
      See all newsletters

      Video

      View All Videos
      • Vintage Sash Windows Get an Energy-Efficient Upgrade
      • Fastening an Exterior Door With Brick Mold
      • FHB Podcast Segment: Proper Flashing for Marvin Windows
      • A Closer Look at Pella's Steady Set Window Installation System with Mike Guertin
      View All

      Window and Door Installation

      View All Window and Door Installation Articles
      • Breathing New Life into Original Windows
      • Mortising a Hinge without a Router
      • Fastening an Exterior Door With Brick Mold
      • Tom Gensmer, Remodeler and Window-Repair Expert
      View All Window and Door Installation Articles

      Fine Homebuilding Magazine

      • Issue 332 - July 2025
        • Custom Built-ins With Job-Site Tools
        • Fight House Fires Through Design
        • Making the Move to Multifamily
      • Issue 331 - June 2025
        • A More Resilient Roof
        • Tool Test: You Need a Drywall Sander
        • Ducted vs. Ductless Heat Pumps
      • Issue 330 - April/May 2025
        • Deck Details for Durability
        • FAQs on HPWHs
        • 10 Tips for a Long-Lasting Paint Job
      • Issue 329 - Feb/Mar 2025
        • Smart Foundation for a Small Addition
        • A Kominka Comes West
        • Making Small Kitchens Work
      • Issue 328 - Dec/Jan 2025
        • How a Pro Replaces Columns
        • Passive House 3.0
        • Tool Test: Compact Line Lasers

      Fine Home Building

      Newsletter Sign-up

      • Fine Homebuilding

        Home building tips, offers, and expert advice in your inbox.

      • Green Building Advisor

        Building science and energy efficiency advice, plus special offers, in your inbox.

      • Old House Journal

        Repair, renovation, and restoration tips, plus special offers, in your inbox.

      Signing you up...

      This site is protected by reCAPTCHA and the Google Privacy Policy and Terms of Service apply.
      See all newsletters

      Follow

      • Fine Homebuilding

        Dig into cutting-edge approaches and decades of proven solutions with total access to our experts and tradespeople.

        Start Free Trial Now
        • Facebook
        • Instagram
        • X
        • LinkedIn
      • GBA Prime

        Get instant access to the latest developments in green building, research, and reports from the field.

        Start Free Trial Now
        • Facebook
        • YouTube
      • Old House Journal

        Learn how to restore, repair, update, and decorate your home.

        Subscribe Now
        • Facebook
        • Instagram
        • X

      Membership & Magazine

      • Online Archive
      • Start Free Trial
      • Magazine Subscription
      • Magazine Renewal
      • Gift a Subscription
      • Customer Support
      • Privacy Preferences
      • About
      • Contact
      • Advertise
      • Careers
      • Terms of Use
      • Site Map
      • Do not sell or share my information
      • Privacy Policy
      • Accessibility
      • California Privacy Rights

      © 2025 Active Interest Media. All rights reserved.

      Fine Homebuilding receives a commission for items purchased through links on this site, including Amazon Associates and other affiliate advertising programs.

      X
      X
      This is a dialog window which overlays the main content of the page. The modal window is a 'site map' of the most critical areas of the site. Pressing the Escape (ESC) button will close the modal and bring you back to where you were on the page.

      Main Menu

      • How-To
      • Design
      • Tools & Materials
      • Video
      • Blogs
      • Forum
      • Project Guides
      • Reader Projects
      • Magazine
      • Members
      • FHB House

      Podcasts

      • FHB Podcast
      • ProTalk

      Webinars

      • Upcoming and On-Demand

      Podcasts

      • FHB Podcast
      • ProTalk

      Webinars

      • Upcoming and On-Demand

      Popular Topics

      • Kitchens
      • Business
      • Bedrooms
      • Roofs
      • Architecture and Design
      • Green Building
      • Decks
      • Framing
      • Safety
      • Remodeling
      • Bathrooms
      • Windows
      • Tilework
      • Ceilings
      • HVAC

      Magazine

      • Current Issue
      • Past Issues
      • Magazine Index
      • Subscribe
      • Online Archive
      • Author Guidelines

      All Access

      • Member Home
      • Start Free Trial
      • Gift Membership

      Online Learning

      • Courses
      • Project Guides
      • Reader Projects
      • Podcast

      More

      • FHB Ambassadors
      • FHB House
      • Customer Support

      Account

      • Log In
      • Join

      Newsletter

      Get home building tips, offers, and expert advice in your inbox

      Signing you up...

      This site is protected by reCAPTCHA and the Google Privacy Policy and Terms of Service apply.
      See all newsletters
      See all newsletters

      Follow

      • X
      • YouTube
      • instagram
      • facebook
      • pinterest
      • Tiktok

      Join All Access

      Become a member and get instant access to thousands of videos, how-tos, tool reviews, and design features.

      Start Your Free Trial

      Subscribe

      FHB Magazine

      Start your subscription today and save up to 70%

      Subscribe

      We hope you’ve enjoyed your free articles. To keep reading, become a member today.

      Get complete site access to expert advice, how-to videos, Code Check, and more, plus the print magazine.

      Start your FREE trial

      Already a member? Log in