What’s the Best Way to Install Cedar-Shingle Siding on an Old House?
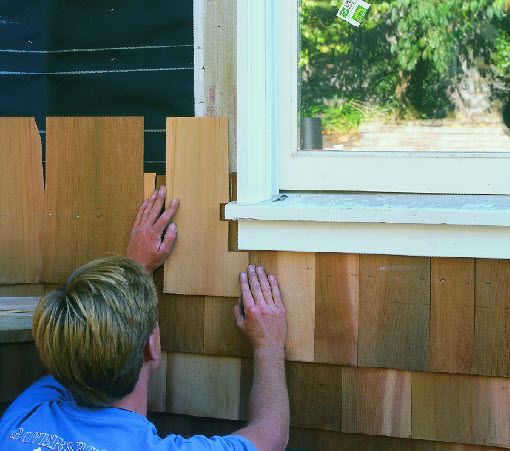
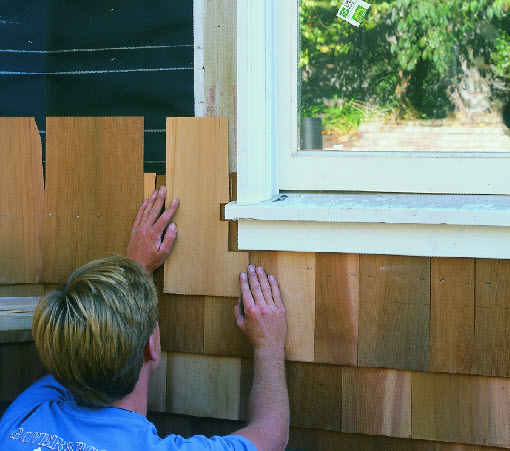
As part of a city lead-abatement program, Erik Neave’s 1865 Wisconsin house is being re-shingled. New white cedar shingles will cover up a layer of painted shingles, which given the age of the house no doubt are contaminated with lead-based paint.
More on Siding:
Video: How To Prime Cedar Siding To Control Bleeding Tannins and Other Staining Problems
Keep Siding Straight With a Story Pole
BUILDING SKILLS: How To Cut Housewrap For Window Rough Openings
The facelift will certainly brighten the appearance of the house while entombing the paint, but it’s the installation that has Neave concerned. The contractor who successfully bid for the job has installed a layer of 1/4-in. fanfold insulation over the old shingles and is busy stapling up the new ones even as Neave writes to Fine Homebuilding’s Breaktime forum for advice.
“I was on my honeymoon when they started and they are about halfway done with the house now,” he writes. “I have never installed shingles before but on the things I’ve seen online, I am a bit concerned about the installation.”
Neave’s worry? Because the singles are being installed directly over the fanfold insulation, there will be no air circulation behind them, and everything he’s read on the subject suggests there should be.
“When asked about this, the contractor said that the fanfold insulation achieves this purpose,” Neave says. “It sounds a bit fishy to me because I thought insulation would do the opposite…I want to trust that they know what they are doing, but it is stressing me out that I won’t really know if this type of installation is quality till a few years down the road when problems show up.”
Here’s how it should be done
Mike Smith, a builder from Rhode Island, lays out for Neave how the job should be approached, beginning with stripping all of the old shingles off the house.
Then, Smith says, replace the flashing at doors and windows, wrap the house with 15-lb. or 30-lb. felt, scrape the lead paint off the existing trim (following EPA lead-abatement procedures), repaint the trim and re-shingle.
“If this contractor does what he’s saying…he is going to bury all your trim…” Smith says. “He’s a hack. Who wrote your specs? Where did you get this guy from? Or perhaps I’m being too harsh. It doesn’t sound like you are going to get a very good job.”
But the windows the contractor has installed look good, Neave replies, and the exterior trim has been built out and capped with aluminum. The real issue here is whether the installation method the contractor has chosen will trap moisture on the back of the shingles and raise the potential for problems down the road.
On that question, Smith is confident the fanfold will not act as a vapor barrier because it should allow the passage of water vapor. Its purpose, he adds, is to level the existing layer of shingles to make a good nail base for the new ones.
“Realistically,” Smith adds. “I don’t know what other choices you have other than choosing a different siding…like fiber cement, or vinyl…or red cedar, etc.”
DanH agrees with Smith.
“About the fanfold,” he writes. “Fanfold siding backer (it’s not really ‘insulation’ to any degree worth mentioning) is almost always perforated so that moisture can pass through to a moderate degree.
“Far from ideal, but it’s not a solid, impervious piece of plastic/foil. How well the shingles will work out on the fanfold is hard to say. Certainly far from ideal, but ideal would cost a lot more money.”
But Piffin does not buy in.
“They should start by tearing off the old shingles,” Piffin says. “The fanfold is OK but requires a breather between it and cedars.”
In these circumstances, the new shingles will hold up only if the climate is dry, there are large roof overhangs and plenty of trees to shelter the house from wind-driven rain, Piffin adds.
[[[PAGE]]]
Concerns about using staples
Other concerns seem to be popping up, including the use of staples to install the shingles, and how much of each course of shingles is left exposed to the weather.
Installers are using 2-in. staples, and Neave sees that some of them seem to be driven slightly below the surface of the shingle.
“The other thing I noticed is that the staples in some cases are countersinking a little bit,” he writes. “They said it won’t be a problem, but things online I read said it will be. Is that a big deal?”
Piffin thinks it is.
“It is a ‘feature’ of hack work,” Piffin writes. “The cedar bureau is very specific that nail heads must NOT penetrate the wood fiber. That shortens the lifespan of an installation.
“With all the layering you have going on, you have one hack job over top of another. Unfortunately, that is part and parcel with most of these gov’t run ‘programs.'”
The weather exposure seems to vary between 5 in. and 8 in. for shingles that appear to be 16 in. long. “The rows aren’t really even,” Neave writes.
On shingles of that length, Mike Smith says, the exposure should be no more than 5 1/2 in., or roughly one-third of the shingle length.
“We used to set up a transit and strike a level line all around the house for ‘gospel.'” Smith says. “Nowadays we use our $99 laser, set up on each floor, swing the compass, drive a few nails and we have a ‘gospel line’ for each floor…ain’t technology great ?
“Last time I had words with one of my guys was about 20 years ago…They had shingled a new addition…Missed the old coursing by about 3/4 in. at the meeting point. He insisted it wasn’t his fault–he had used a level.
“I pointed out to him the difference in coursing…and the idea of using a level and being level.”
Makita888 adds this:
“I live on the north shore of Massachusetts and lived on Nantucket for several years where everything was cedar shingles. Staples were always a problem due to lack of a big enough stagger on siding as well as breaking the grain. We use ring shanked galvy or stainless and never exceed 5 in. exposure…
“We also make benchmarks and story poles to ensure hitting tops and bottoms of windows, simple math. Old houses may require stringing and pinning the line in more than one place to ‘look level’ when the house windows are out of level.”
Fine Homebuilding Recommended Products
Fine Homebuilding receives a commission for items purchased through links on this site, including Amazon Associates and other affiliate advertising programs.

Affordable IR Camera

Reliable Crimp Connectors

Handy Heat Gun





View Comments
We have done these goverment jobs before and all you can do is bid it based on the job scope. The fan-fold and tape is to insure that no lead dust finds its way out.
If you needed some photos to serve as a negative example, we can provide some from our current job. We were called in to paint/stain after the re-shingling was done, but there are a lot of obvious problems.
The exposure is too large for the shingles and the coursing that they used; in many cases we see Tyvek in the gaps. Most of the shingles are face nailed and the nails are all over driven. There are some new dormers and the fascia & bargeboards on the dormer cheeks aren't thick enough/properly packed out, so the top edges of the shingles stick out and are exposed to the weather. The one details that has already caused problems and will continue to do so is that the flashing around the windows was improperly done. We can see the top edges of the drip cap flashing through the gaps in the shingles and the edges of the nailing flanges in some of the gaps. The windows and flashing were simply installed over the Tyvek. This allows water to penetrate behind the flashing and into the wall cavity around the windows. This has already caused blistering of the paint on the window casing.
Great Article. Thank you for posting this. You might be interested in checking out fine luxury homes by Brejnik Fine Homes(www.brejnik.ca). They build fine luxury houses. Brejnik team consists of qualified and trusted: Architects, Interior Designers, Appraisers / Lenders, Trades & Suppliers, Geo-technical engineers, Structural Engineers, Arborists, Landscape Architects, Pool & Water Feature.