3 Shower-Pan Choices for a Solid Tile Floor Installation
Get an overview of a few popular, time-tested ways to create a waterproof base before installing tile in your custom bathroom project.

If your next bathroom remodel includes a tub or prefab fiberglass shower base, then the installation is going to be pretty straightforward. But, if you’re thinking of installing a tile shower floor, you’ve got some decisions to make when it comes to your method of installation.
3 Popular choices for a custom shower pan
All three of these methods will result in a professional-quality installation, but the one you choose will be dictated by how much labor you’re willing to put in (or pay for), and how custom you want the job to be.
Option 1: A traditional mud pan
This is the traditionalist approach to preparing a shower floor, and requires some labor. We have an excellent start to finish article, Installing a Leakproof Shower Pan, on the process, but here’s what’s involved:
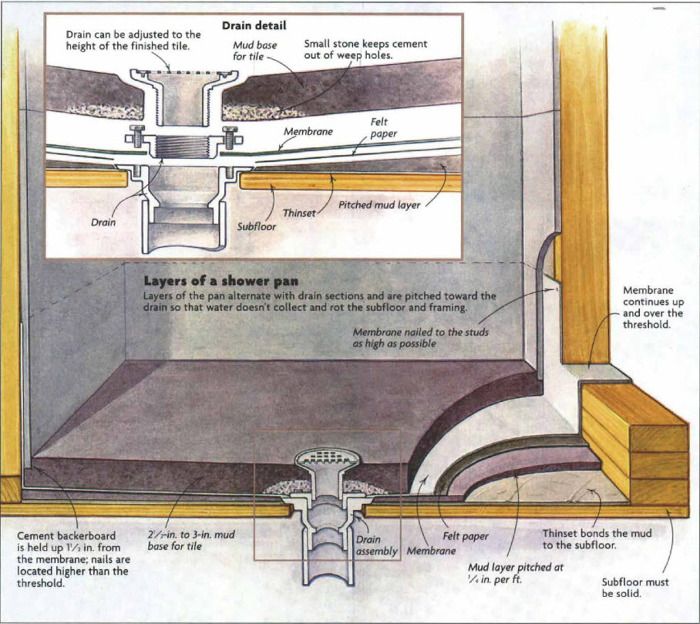
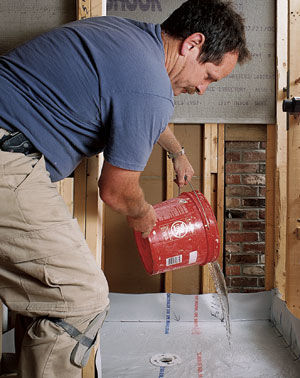
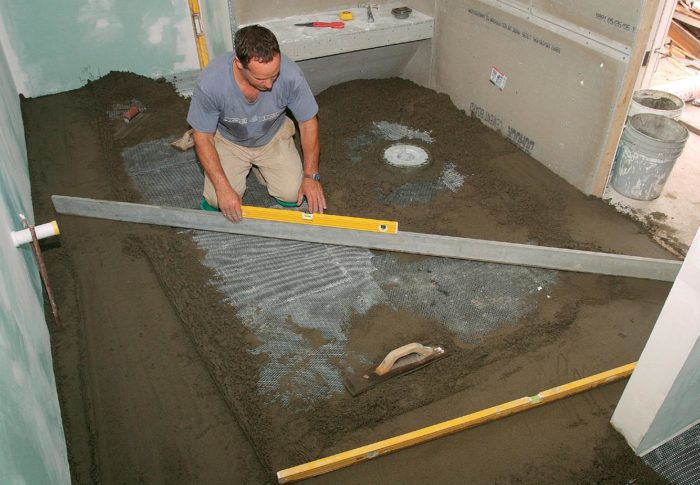
 After the shower has been rough framed, a thin layer of Portland cement and sand (aka “mud”), just wet enough to cling together, is laid across the subfloor and pitched toward an adjustable drain in the center, or to a linear drain along one of the edges. Next a waterproofing membrane (a product called Chloroloy is a popular choice) is laid down over a layer of felt paper (sometimes called “tar paper”), covering the sloped mud bed and integrating with a flange on the adjustable drain. The membrane also extends several inches up the walls of the shower framing, creating a waterproof pan. From there, sheets of tile backerboard are fastened to the wall framing, and another 2 to 3 inch layer of Portland cement and sand are applied over the membrane, again sloped towards the drain. Once the top layer of cement has dried, tile can be adhered to your new pan using thinset cement. If the drain is in the center, the tile you choose can’t be more than 4 in. wide. Any larger than that, and the tiles won’t be able to conform to the gentle slope of the mud pan. If you’re itching for bigger tiles and less grout joints, consider the linear drain option mentioned above, which won’t limit you when it comes to tile size. Note that there are companies that sell forms that help get the slope right. This option might be a good choice for anybody who’s nervous about their skills with dry-packed mortar. And although it’s often shown being used for small shower stalls, it’s perfectly suitable for larger installations, such as replacing a tub with a shower, too.
Option 2: A thin-bed mud pan
Imagine taking the concept of a traditional mud pan, but instead of placing the membrane under a thick layer of mud, you’re putting it on top of the mud. That’s the concept for a thin-bed mud pan installation. Tile is then adhered to the top of the membrane using thinset cement. Note that the sloped mud bed is still providing the drainage, just like in a traditional pan, but the mud pan won’t be getting saturated.

Why does this matter? Because if the membrane under the thick layer of mud is installed without an adequate slope or the weeping mechanism in the adjustable drain is blocked, water will just sit in the mortar bed and never dry, and that can lead to problems with grout failure or worse. Another perk is that with a thin-bed installation you only have one mortar bed instead of two, which means less time waiting for the mortar to cure (about 24 hrs), and eliminates the weight of the mortar. This thin-bed mud approach is also the method of choice when building a barrier-free bath, where the floor of the bathroom connects directly with the floor of the shower rather than being separated by a curb (see A Sloping Floor for a Barrier-Free Bath, and also our full video series on the same topic: Tile a Barrier-Free Bathroom).
Option 3: A pre-sloped pan form ready for tile
Getting the slope of the mortar bed right isn’t unreasonably difficult, but there are ways to get it wrong, especially if this is your first try working with dry-packed mortar. Earlier I mentioned the option of a form that helps you create a perfect slope. An even simpler option is to eliminate the mud altogether, and choose a sloped shower pan that already has the waterproofing layer attached. These pans are made by several companies (Noble and Schluter are two mainstays), may be foam or plastic, and are available in a variety of shapes and sizes. Tile Redi is one company that makes these shower pans in both standard and custom sizes. We haven’t done any full length articles on these kits, simply because they are very specific products with their own detailed instruction manuals, but they are quite popular and easy to use. After adhering the pre-sloped base to the subfloor, and then the pre-bonded pan waterproofing membrane is integrated with the waterproofing of the walls, and the surface is ready to be tiled. This method is usually much more expensive than the traditional or thin-bed approaches, but it does provide more predictable results.
Once you have a pan, it’s time to move on to the tile
Here are several videos and articles that show all the steps you need to execute a high-quality tile installation:
Video Series: Tile a Barrier-Free Bathroom – See the entire installation process, from mortar base to tile to linear drain.
Upgrading to a Tile Shower – Learn from a pro tilesetter how to remove an old bathtub and replace it with a custom tile shower.
Can I tile over a tiled shower pan? A pro tilesetter gives tips for a solid installation without removing existing tiles.
Waterproofing a window in a tiled shower – There are a few different ways to approach this project.
Fine Homebuilding Recommended Products
Fine Homebuilding receives a commission for items purchased through links on this site, including Amazon Associates and other affiliate advertising programs.

Get Your House Right: Architectural Elements to Use & Avoid

A Field Guide to American Houses

Code Check 10th Edition: An Illustrated Guide to Building a Safe House


View Comments
I saw a site built fiberglass shower pan in Austin , Texas recently and was pretty surprised it met code. The installer told the home owner he had never had one leak. Do you have any information on this, like how to seal the drain to pan?
I'd offer that a fourth option, that I'd place at #1, would be the Schluter Kerdi shower system. The first I installed close to ten years ago has performed as advertised. It dries completely, immediately after use, and has never grown so much as a speck of mold or mildew. The material cost buy-in is higher than a couple yards of PVC membrane and the bags of mortar, but it results in a thoroughly impermeable barrier between the wet and dry sides, and and smooth, flat, square base upon which to set your tile. I'm not affiliated with Schluter in any way, but am a big fan of their very well engineered products.